It is an undeniable fact that car headlights are critical for increasing and maintaining visibility when driving. However, if your car lights are not aimed in the right direction, they could actually make it more difficult for you and other road users to see. You should make sure that the angle is just right so that you don’t blind other drivers, and to prevent collisions.
The lights often need to be realigned after they have been replaced, but they can also be affected by simple things such as heavy loads, tyre pressure, minor collisions, and worn or damaged components. Even modern adaptive headlights require adjustment every once in a while. Thankfully, most car owners will only need to adjust one set of headlights, as adjusting the low-beam headlights often resets the high-beam lights.
Some vehicles also feature bubble levels or diaphragms to make this easier. This way, all you have to do is align the bubble or angle indicator with the markings. For vehicles that don’t have these alignment features, there are a few more steps to follow, which are outlined in the guide below. The adjustment process will vary depending on the make and model of the vehicle. It is therefore advisable to read through the manufacturer’s instructions in the vehicle owner’s manual before getting started. Different countries will also have different regulations regarding the cutoff lines for beams.


Why adjust headlights?
Correctly adjusted main-beam headlamps are the key to safer driving, giving you a clear view of the road. Optimised road illumination ensures better visibility, reduces blind spots and provides balanced lighting. A headlight aiming adjustment chart will help you accurately align your headlights by measuring and adjusting the correct beam height. If you’re not sure how to adjust your main-beam headlamps, follow the guidelines on the chart and use the adjusting screws to fine-tune the aim.
How to adjust headlights: step-by-step
Over time, headlights can shift due to road vibrations or changes in vehicle weight, making it necessary to readjust them. Follow these step-by-step instructions to adjust your headlights to the correct beam height.
- Prepare the vehicle. The first step is to make sure that the tyre pressure is correct and your fuel tank should be half-full. Make sure to leave the items that you would normally carry inside your car where they are, including heavy tools and the spare tyre, as this weight may change the pitch of your vehicle, affecting the angle of the light beam.
- Jounce the suspension. To do this, you need to hold onto either the bumper support or radiator grille support and bounce the vehicle up and down a few times to ensure that it settles in the right position.
- Park the vehicle. Park it as close to the target wall/door as possible, facing it head on. It should also be parked on a level surface. Measure the distance between the headlights and the target. The distance should be the same on both sides.
- Turn on the low beams. Please note: If you are doing this in an outdoor setting, you will need to wait until it is dark enough for you to see the headlights clearly. The fog lights and high beams should remain switched off.
- Mark the centre lines. Using the tape mark about the centre line of the beams on the wall/door. To mark the horizontal centre line, place the first piece of tape directly above the top of the headlight pattern on the driver’s side and then do the same for the other headlight on the other side. Next, you will need to mark the vertical lines. Use the tape to mark the lines going down the centre of the lights.
- Back the vehicle up. You will then need to reverse approximately 8 metres (or 25 feet) away from the target surface in a straight line. You can measure this distance using a tape measure. For a more precise adjustment, you can also adjust headlights at 10 feet to fine-tune the beam alignment before moving further back.
- Locate and access the adjustment screws. The location should be specified in the owner’s manual.
- Compare the beams with the markings and adjust the lights accordingly. For vertical adjustments, the top of the most intense point of the light beam should be below or in line with the horizontal centre line. You should refer to the vertical line when making horizontal adjustments. In countries with right-hand drive cars, such as the UK, the lights point towards the left, whereas left-hand drive lights point to the right. The direction is important as if the lights face the wrong way it could affect the oncoming traffic.
It is important to ensure that headlamps are aligned correctly, as this can contribute to maintaining clear vision and minimising distraction to other drivers. Use the following chart as a guideline for headlight height and adjustment distance based on your vehicle type.
| Headlight Adjustment Chart | ||||
|---|---|---|---|---|
| Vehicle Type | Low Beam Height (cm from ground) | High Beam Height (cm from ground) | Adjustment Distance (m) | Remarks |
| Compact Cars | 55–65 cm | 75–85 cm | 7.5 m | Ensure even alignment on both sides. |
| Sedans | 60–70 cm | 80–90 cm | 7.5 m | Adjust slightly downward to avoid glare. |
| SUVs | 65–75 cm | 85–100 cm | 10 m | Keep low beams slightly lower to prevent dazzling other drivers. |
| Trucks | 70–85 cm | 95–110 cm | 10 m | High beams should be parallel to the road. |
| Motorcycles | 55–70 cm | 75–90 cm | 5 m | Ensure a symmetrical beam pattern. |
| Vans | 65–80 cm | 90–105 cm | 7.5–10 m | Adjust to compensate for cargo weight changes. |
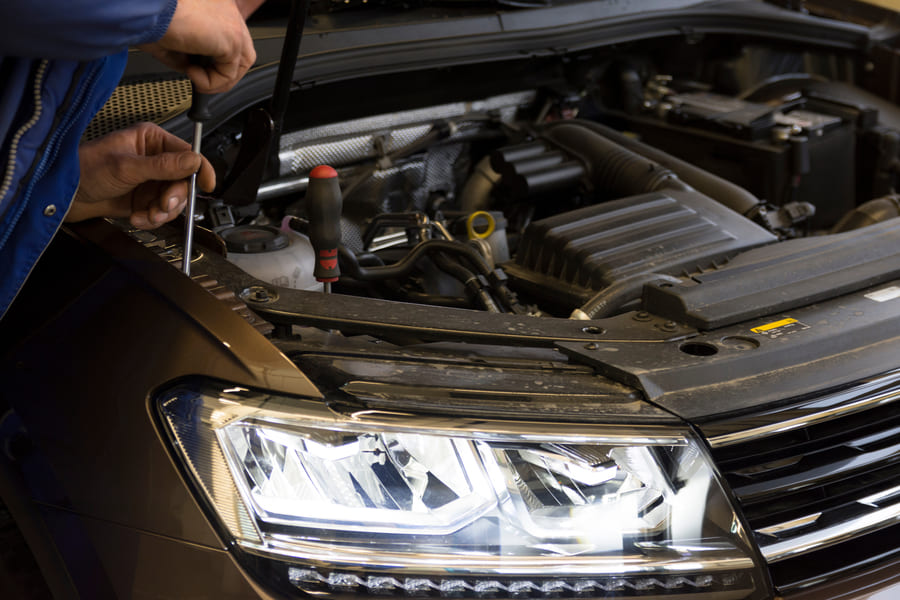
Where are the headlight adjustment screws?
To locate the headlight adjustment screws, start by opening the bonnet. You’ll usually find one screw on top of each headlight and another on the side. The side screw is positioned closer to the centre of the car, meaning it’s on the right side of the left headlight and the left side of the right headlight. Use a screwdriver to make adjustments. The top screw controls the beam’s height, moving it up or down, while the side screw adjusts the beam’s direction, shifting it left or right. Remember: Before reaching under the hood, ensure the engine is off and cool.
It’s important to refer to your vehicle’s manual for specific guidance, as the exact location and operation may vary slightly depending on your car’s make and model.
How to adjust LED headlights
Adjusting LED headlights is similar to adjusting traditional headlights but requires more precision due to their increased brightness. The process involves:
- Preparation: Park on a level surface with the vehicle facing a wall.
- Measurement: Mark the centre of each headlight and its height on the wall, subtracting 2 inches for the beam target.
- Adjustment: Move the vehicle back (about 25 feet) and adjust the headlight screws so the brightest part of the beam is just below the marked line.
- Testing: Take a night drive to ensure proper alignment and check that the headlight beam is set correctly.
Signs of misaligned headlights
If other drivers are frequently flashing their lights at you when you are driving in the dark, it is probably because they are getting blinded by your lights or because there is a problem with the bulbs. If the headlights only illuminate 20 feet or less of the road ahead, they are aimed too low. If they are aimed towards the ground, this may also cause glare due to the reflection from the road, affecting the driver’s eyesight.
Headlight alignment: tools & equipment
Whether you’ve installed new headlights, noticed an uneven beam pattern or recently replaced suspension components, you may need to adjust your headlights. You’ll need some essential tools and a suitable work area. It’s important to have at least 10 metres of free space in front of a flat, vertical surface, such as a wall or garage door, to properly assess and adjust the beam pattern.
Each tool in the list below plays a vital role in the alignment process, helping to make precise adjustments for accurate beam position.
Essentials list:
- A tape measure – Used to measure the height of your headlights and ensure even alignment on both sides.
- Masking tape – Helps mark reference points on a wall or garage door for accurate beam adjustment.
- A ratchet or screwdriver – Needed to adjust the headlight screws and fine-tune the beam direction.
Remember: Check your headlights regularly, especially after any significant changes to your vehicle’s weight or suspension, to maintain optimal alignment.

 @user_212511305.01.2024 11:34Member
hello, I recently fitted new headlights from you for my Peugeot Boxer 2005 campervan but the dipped beam points to the right (Euro) and I need them for UK driving, how can I correct?
 @Jessica_L08.01.2024 15:54Member
You have purchased right-hand traffic headlights, you need to change them to the left-hand traffic headlights, there is no other way to solve this issue.


Comments – 2